How do I assemble the wheel?Updated 9 months ago
We have an assembly video here that will give you a quick overview of the steps. For more detailed instructions, read and follow the steps below. Please note that these instructions apply to the Generation 6 Wheel ONLY. While some of these steps may be similar for older generations, you will want to refer to specific instructions for your wheel's generation for best results.
Part 1: Base Assembly
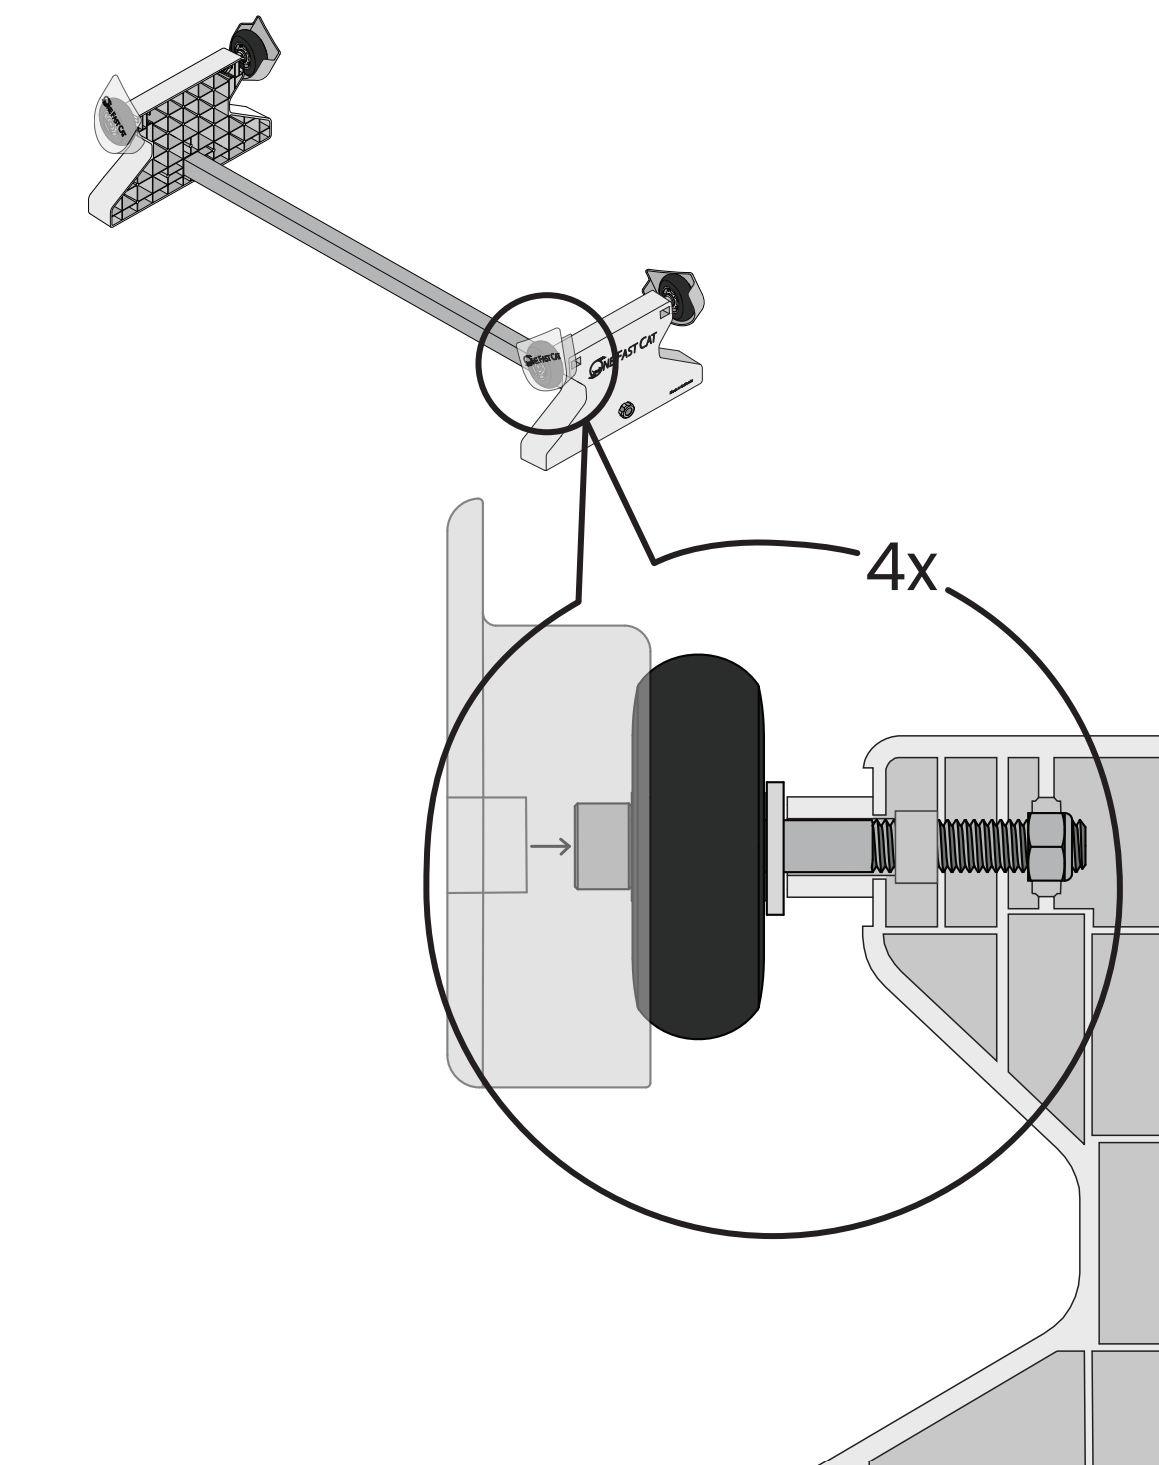
Step 1: Install the inline wheels onto each base panel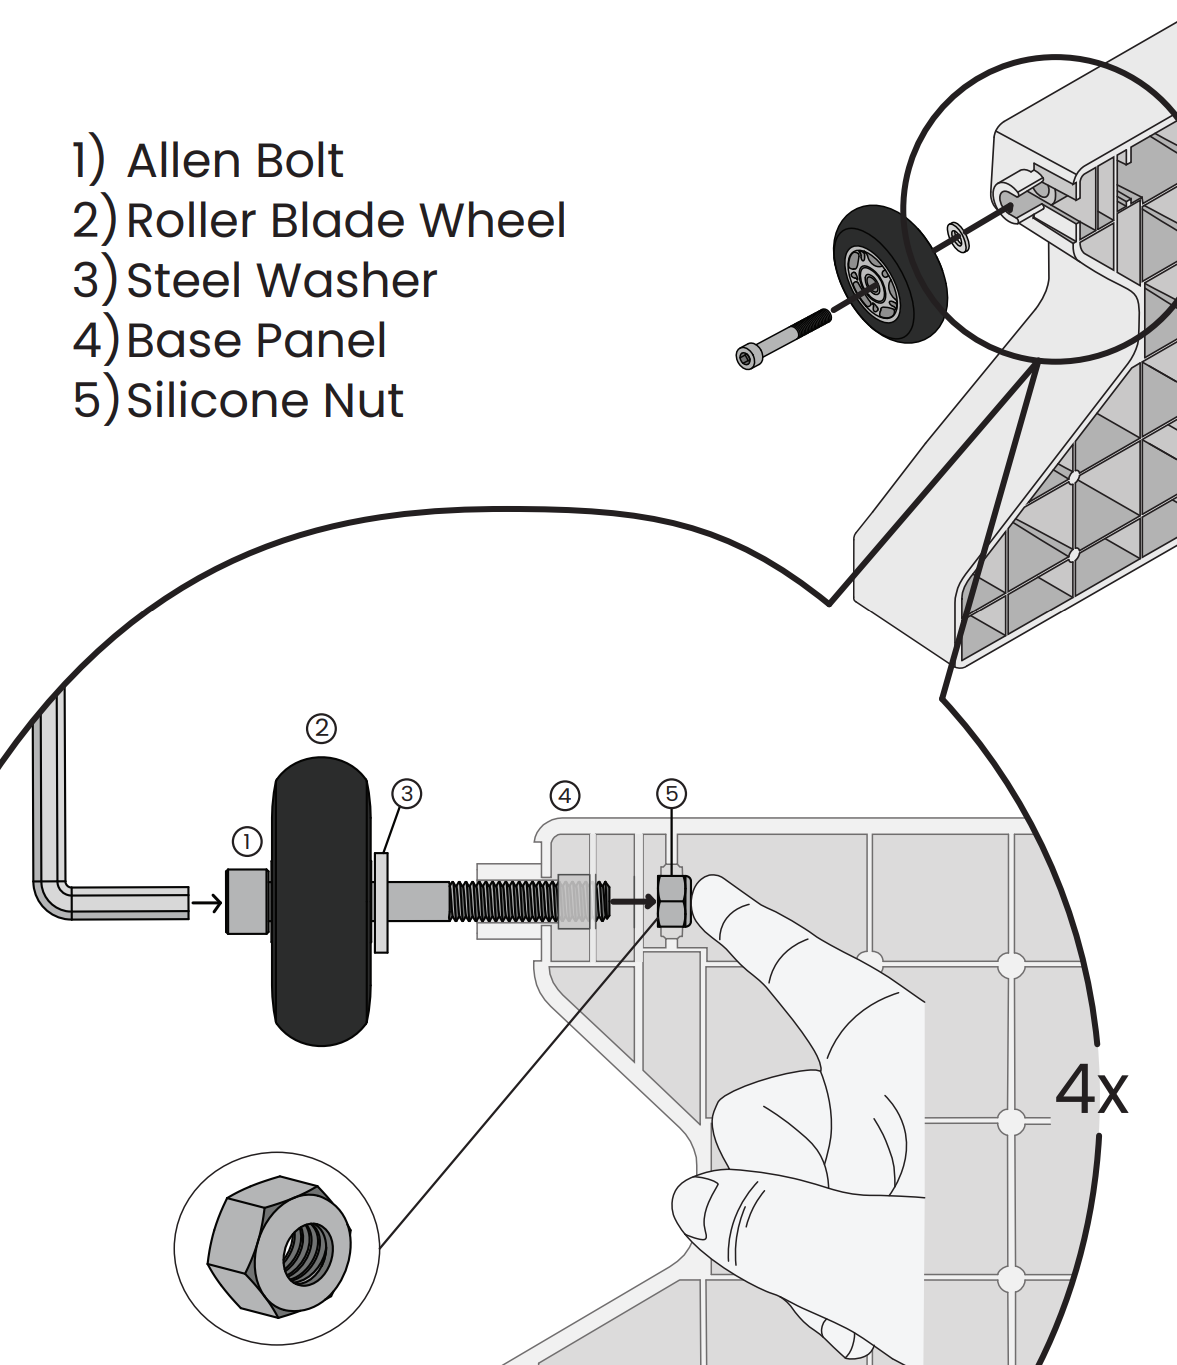
- Slide the allen bolt through the center of the inline wheel, then add a steel washer to the bolt.
- Insert a silicone nut into the base panel in the matching slot across from the socket, and make sure the rounded end of the nut faces away from the socket.
- Hold the nut in place with a finger while inserting the allen bolt with inline wheel through the socker.
- Use the allen wrench to tighten the wheel. It should be tight enough to stay in the socket on its own, but loose enough to have a bit of wiggle back and forth. Overtightening the wheel will lock the nut to the bolt and will put a lot of resistance on the big wheel, making it harder to turn, noisier, and will exacerbate its natural wobble.
- Repeat these steps three more times until all four inline wheels have been installed onto the two base panels.
Step 2: Insert the threaded rod into one base panel
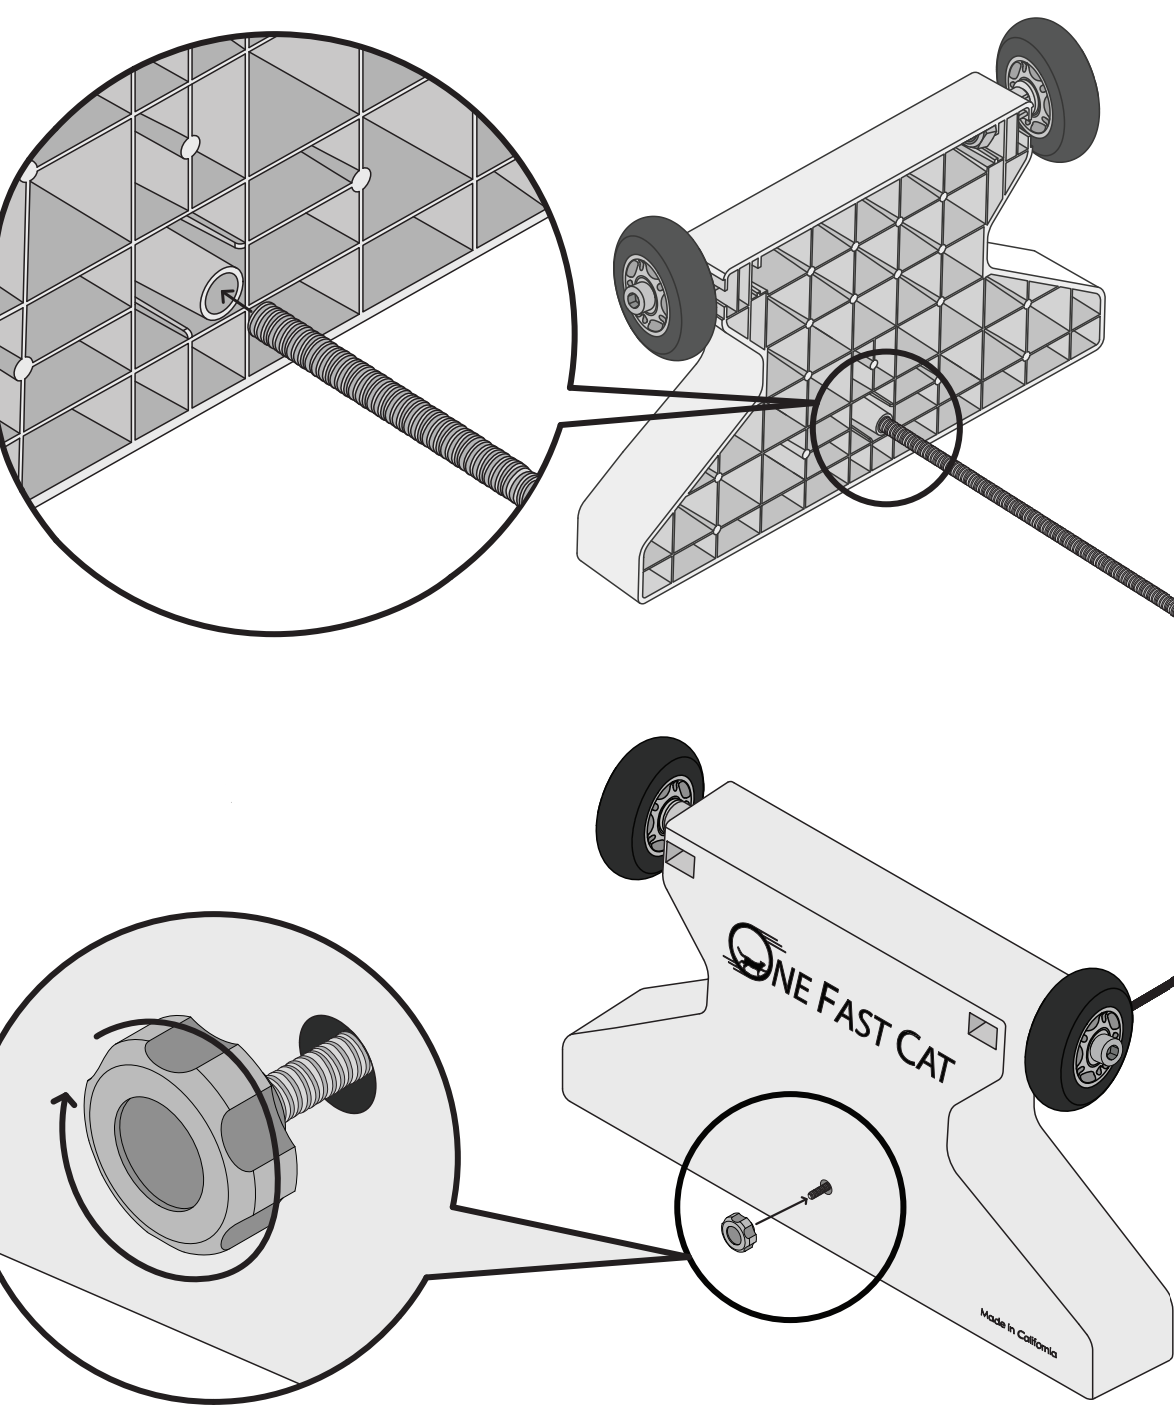
- Locate the rounded slot inside the square-shaped socket on the inside surface of the base panel
- Line up the threaded rod and slid it through this slot until it protrudes out the other end
- Attach the rod cap to the end and twist clockwise by hand until tight. Maintain a firm grip on the threaded rod with one hand while tightening to prevent the rod from spinning with the cap.
Step 3: Attach the steel bar
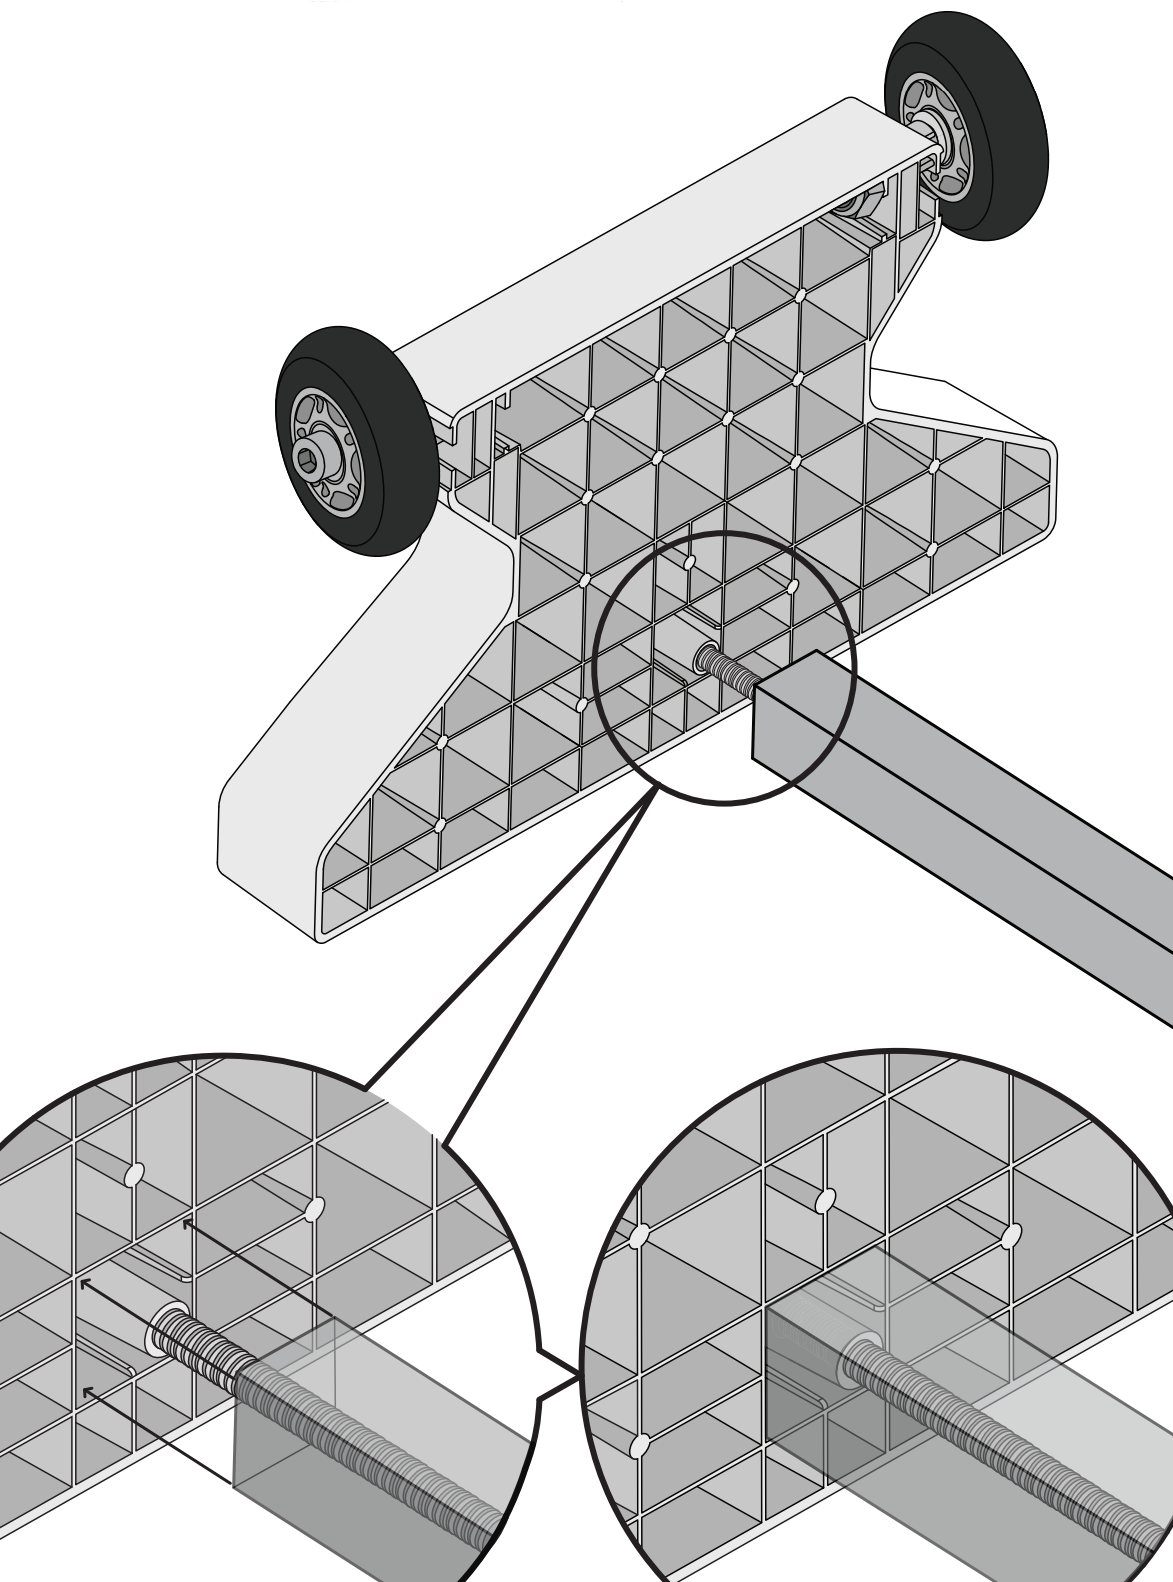
- Line up the bar with the free end of the threaded rod and slide the bar over the rod completely.
- Make sure that the bar inserts into the socket fully. It should not stop at the entrance to the socket.
- If you do not insert the bar into the panel fully, there will not be enough of the rod sticking out the open end for you to attach it to the second base panel.
Step 4: Attach the second base panel. Make sure you are working on a flat and level surface.
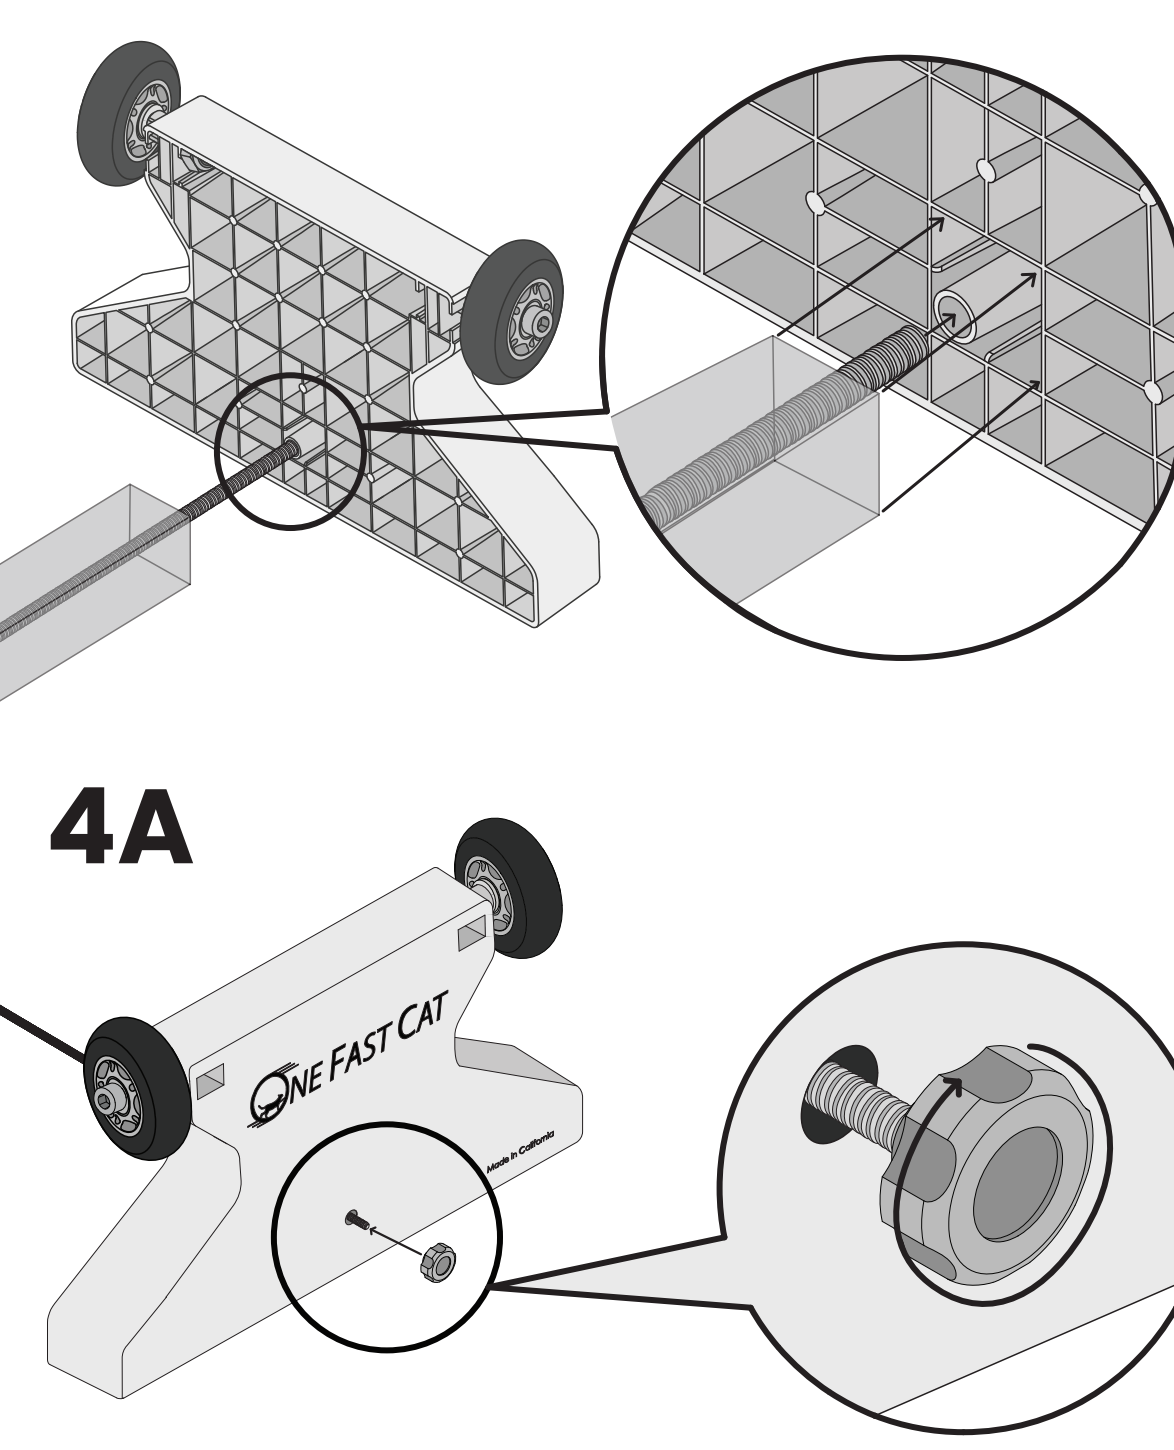
- Line up the exposed end of the rod with the circular slot on the inner surface of the second base panel. In the photo above, the amount of visible threaded rod is exaggerated to make this step clearer. Your rod will not be sticking out this much.
- When the rod is lined up with the slot, slide the base panel onto the rod and then onto the bar, making sure the end of the bar inserts fully into the base panel.
- There should be roughly half an inch of the threaded rod sticking out the front of the base panel. Attach the second rod cap and twist clockwise until tight.
- If the threaded rod is not sticking out far enough for the cap to attach, wiggle/adjust your panels until both ends of the steel bar are fully seated in their respective sockets.
Step 5: Attach the rubber feet to the base
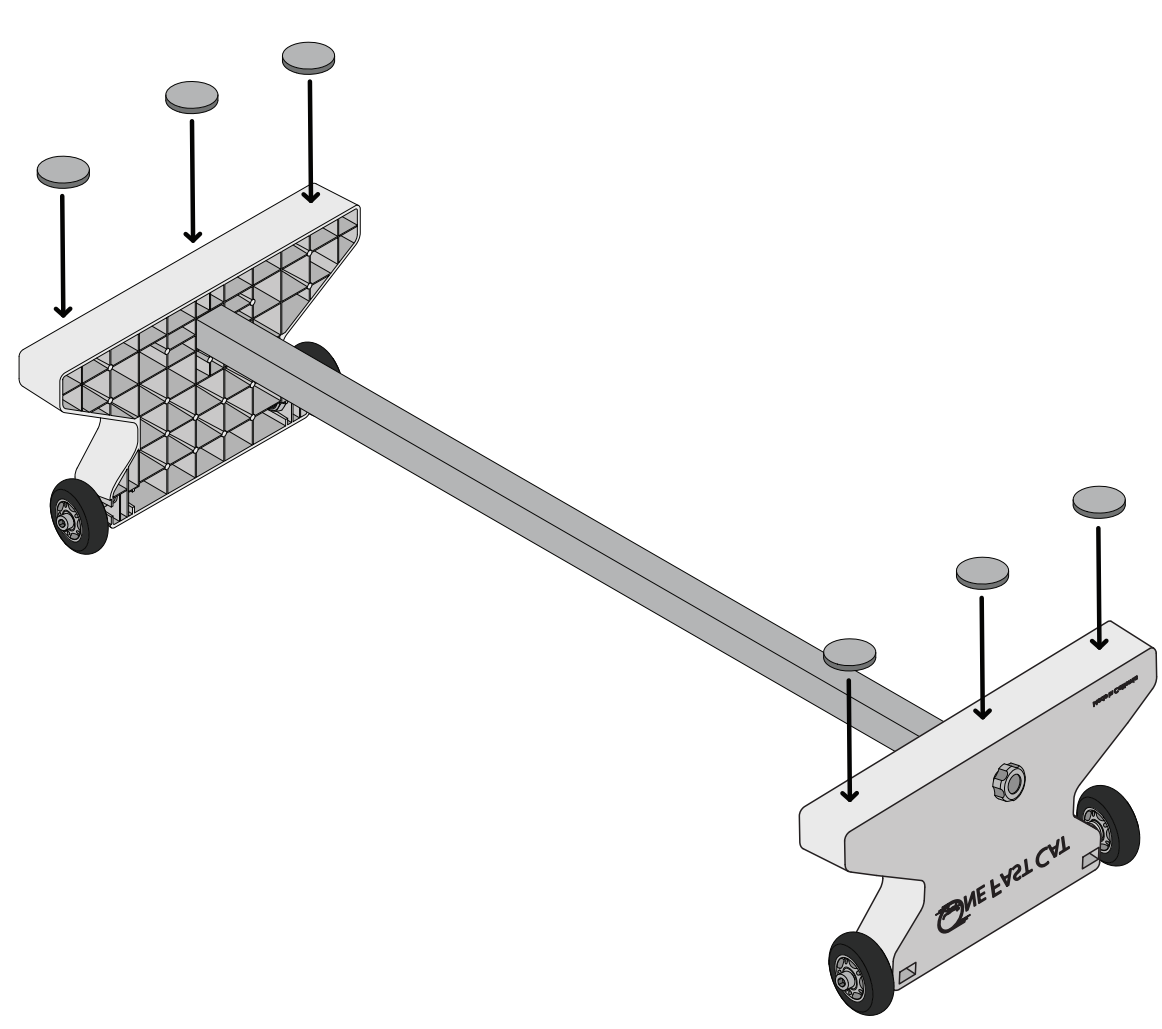
- Flip the base over so that it is sitting on the inline wheels and wipe the bottom of each panel clear of any dirt, dust, or fur.
- Peel the paper backing off the rubber feet and stick the adhesive side down on the plastic. Press firmly to ensure a good grip.
- Place the rubber feet in the configuration shown above, with one near each end of each panel and one in the center of each.
Step 6: Secure the wheel covers over the inline wheels (optional)
- Line up each of the four wheel covers so that the round socket on their inner surface lines up with the rounded bolt head sticking out of the center of each inline wheel.
- Press the wheel cover down firmly to attach it to the bolt.
- Tilt the wheel cover so that it sits at an angle, facing towards where the center of the big wheel will be once assembled and placed on top of the base
- Wheel covers are optional and do not need to be installed. If you have LED wheels and would like to get the full color effect, leave the covers off.
Part 2: Wheel Assembly
Step 1: Construct the side rings
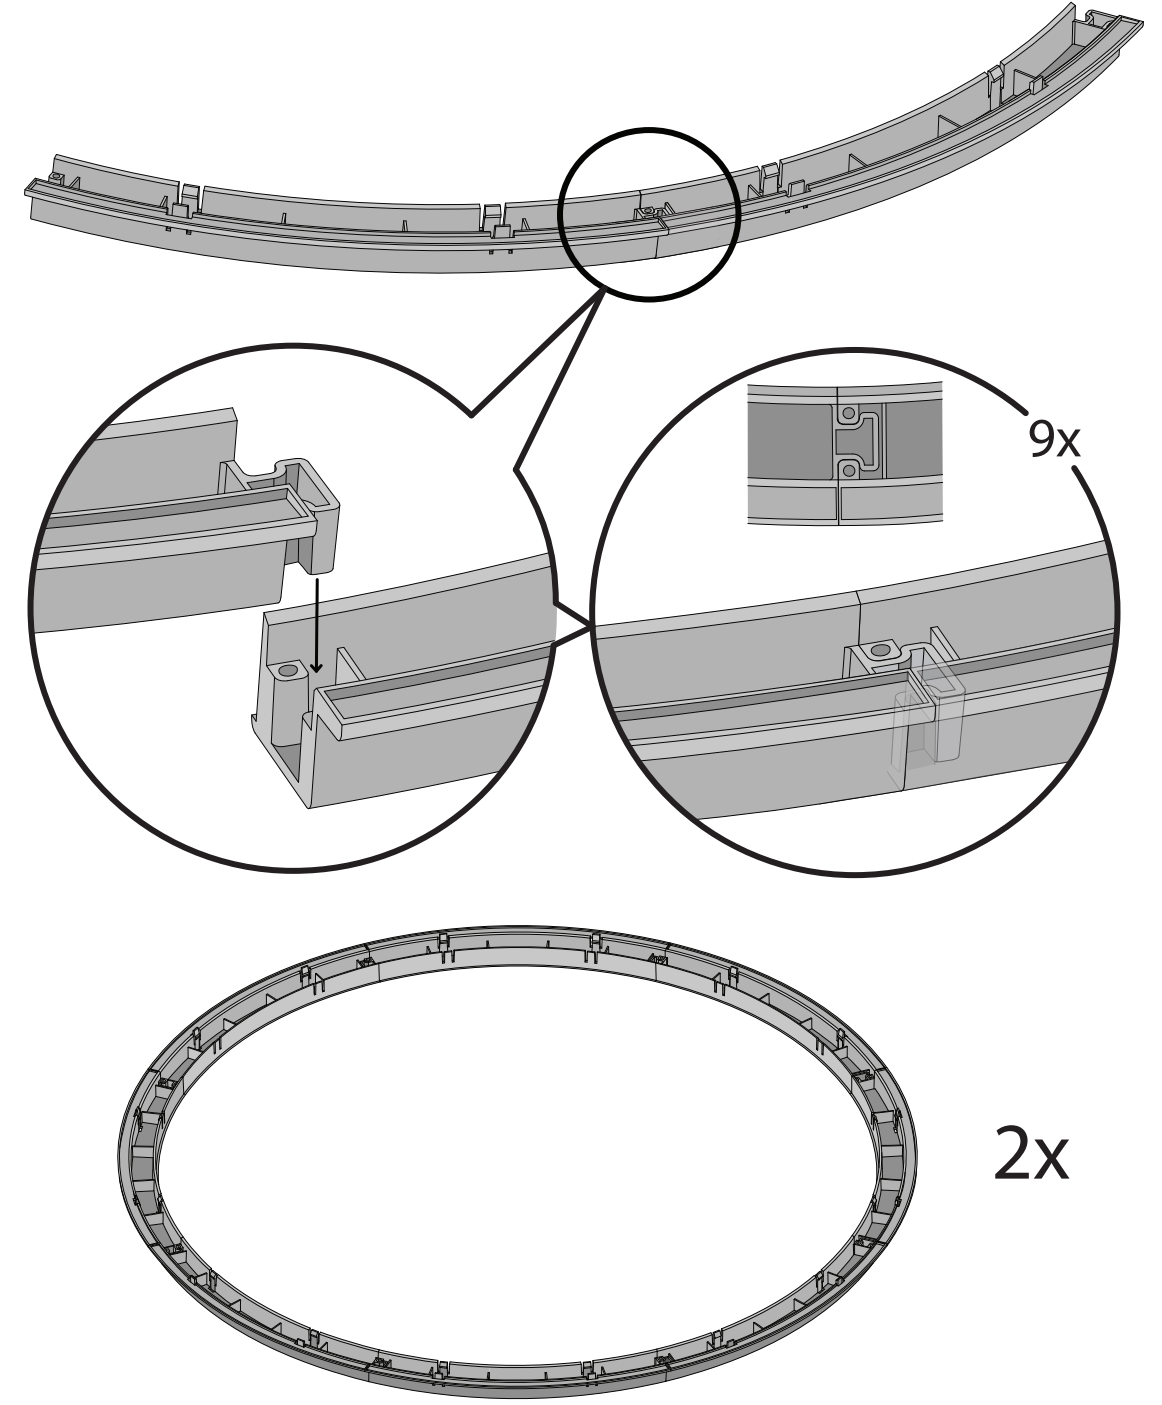
- Connect 8 side tracks together to form one ring by inserting the male end of each part into the female slot of the adjacent part.
- Repeat for the second ring.
Step 2: Build the center of the wheel
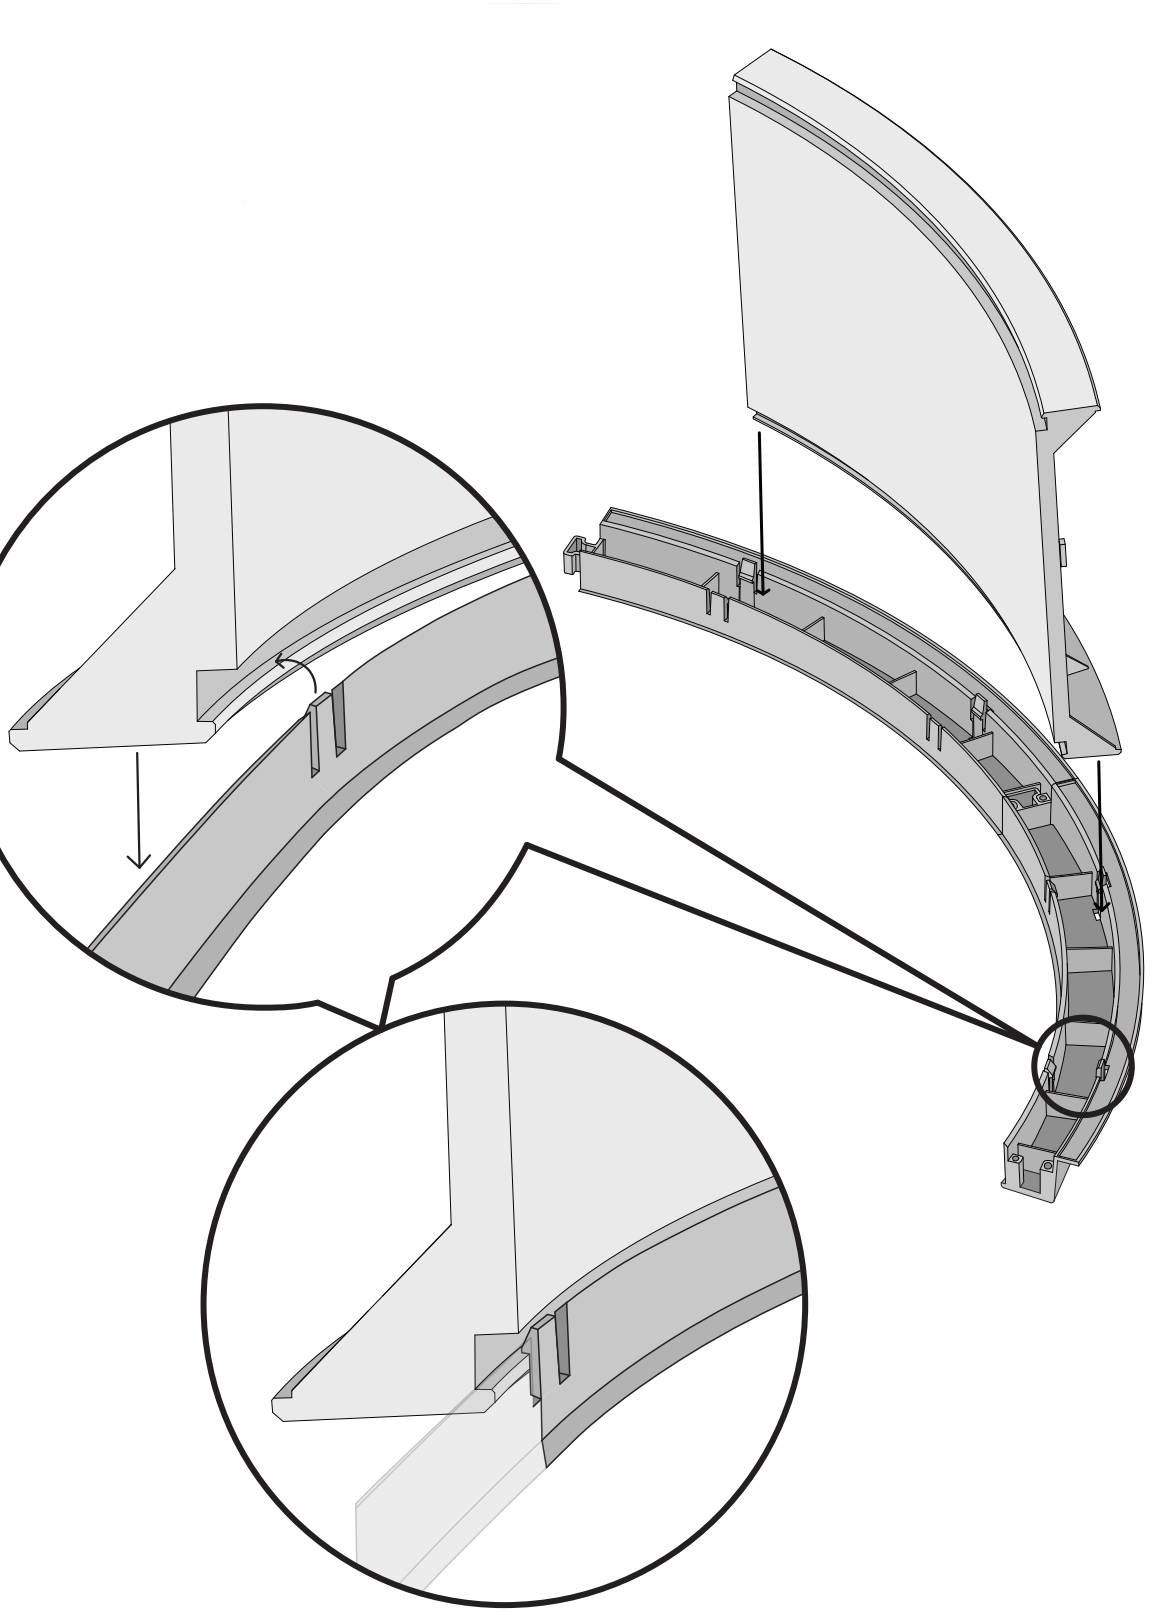
- Insert all nine center tracks into one of the side rings to create the running area of the wheel.
- Press down each center track until the connector tabs of the side tracks lock into the groove of the center track with a click.
- Center tracks can be slid back and forth as needed to make space as new tracks are inserted. Once the final track is in place, adjust the tracks as needed to close up any large gaps.
Step 3: Place the second side ring on the wheel
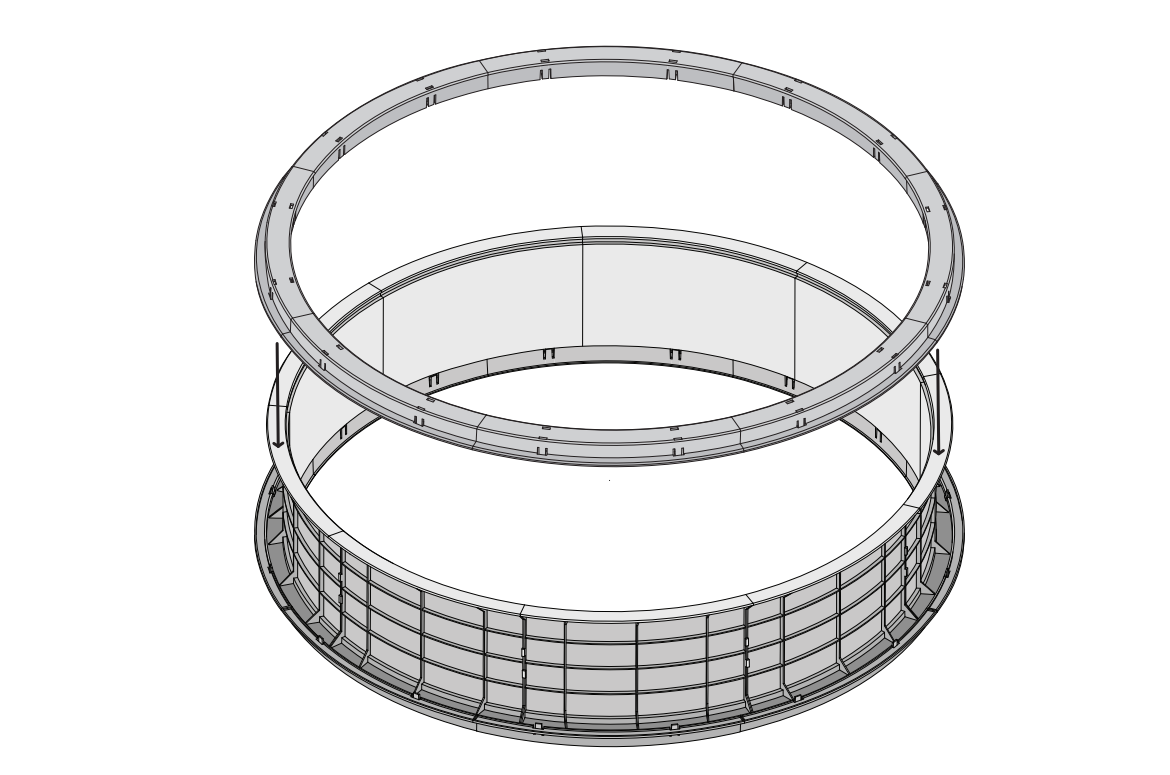
- Line up the second ring with the center tracks and lower it down until it sits on top of them. You may need to tilt the tops of the center tracks in towards the middle of the wheel to line them up with the second ring.
- Press down on the side ring until it attaches to the center tracks. You should hear each part click as its connector tabs engage with the grooves on the center tracks.
- Slide your hands along the second ring and press down periodically until every side track of the ring is fully connected to the center tracks
- Alternatively, you can build the second ring on top of the center tracks by placing the side tracks down one at a time, but getting the last side track in place to complete the ring is more difficult with this method. Do not fully snap down the side tracks until all of them are in place first, just in case you need to make adjustments.
Step 4: Place wheel on base
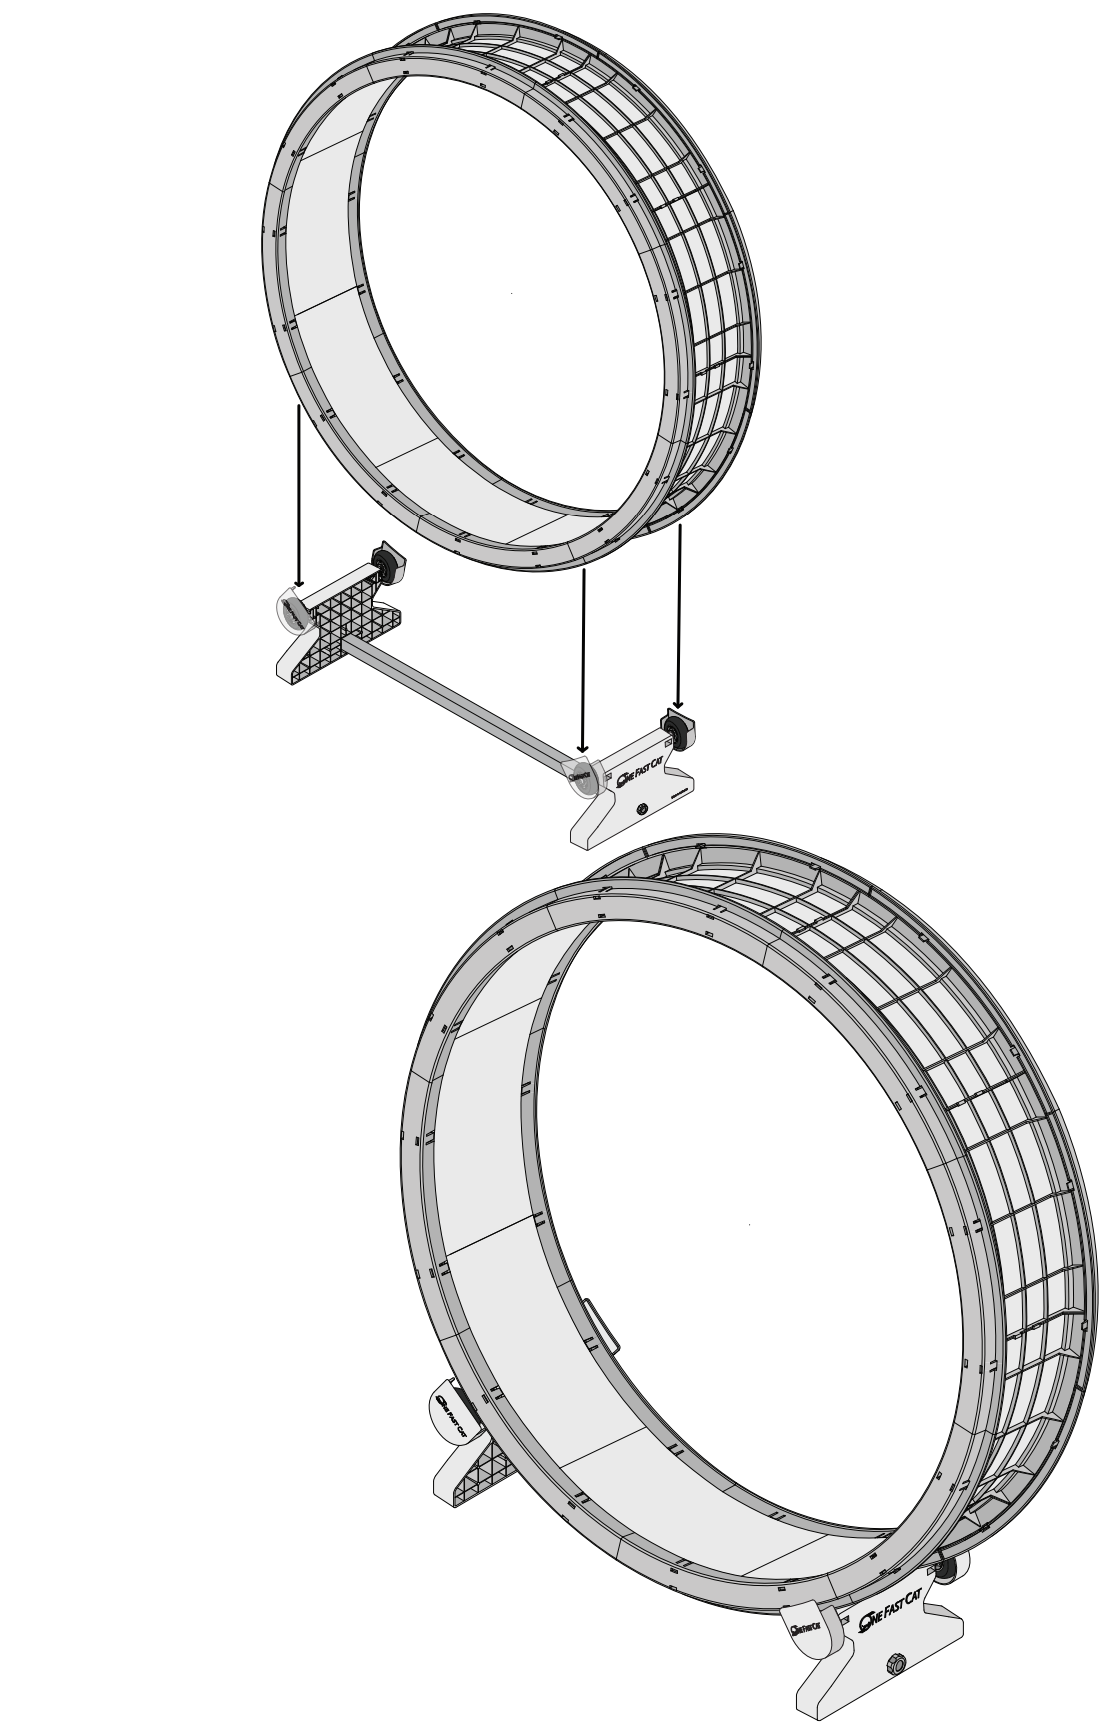
- Line up the rims of the side rings with the inline wheels on the base and lower the wheel until each rim is resting on two inline wheels.
- Give the wheel a test spin by hand. Make sure it does not come into contact with the wheel covers while spinning.
- If the wheel has trouble rolling or comes to a stop quickly after you've released it, the wheels on the base are too tight and should be loosened up until the big wheel can spin easily and freely.
Step 5: Apply the traction pads

- Peel the backing off each pad and stick it onto the plastic of the inside surface of the wheel.
- It's best to peel off part of the backing from one end, line that end up with the side edge of the wheel, press it down, and then peel the rest of the backing off, pressing down as you go so that air pockets don't get stuck under the pads.
- Line up the edges of the pad with the next one as closely as possible to avoid any overlap of the last pad with the first one.
- If you do get some overlap with the final pad, you can trim that bit off, tuck it into the seam of the first pad, or leave it as is; it won't interrupt your cat's stride.
- With all pads in place, the wheel is now ready for use!